Web Forms
Webforms are similar to pages with a few fundamental differences.
Step 1. Create the Webform Page
The first step involves creating a Webform with only the basic content filled in: Title, Menu Link and URL Path.
Note: Only the Title is required for you to start adding a form on the page.
 the page when the basic information has been filled in.
Step 2. Add Form Components to the Page
You will be brought to a page to add Form Components to your page.
Note: If you ever need to go back and edit your form, click the  tab.
tab.

Picture 1
On this page you can add as many components as you need to the page. Simply fill out the Component Name, Type and Required checkbox. These fields are shown in Picture 1. Component Types and there descriptions are listed below.
Once you hit the Add button, you will be brought to a page to fill out additional settings for the component you have just added.
Webform Component Types
- Date - Adds a date field which users can select a month, date and year individually.
- Time - Adds a time field which users can select the hour, minute and seconds individually.
- E-Mail - Adds an e-mail field where users can insert their e-mail address into the form.
- Fieldset
- File
- Grid
- Hidden - Hidden components, like their name suggests, do not show up to the user. Hidden components are nice if you need to have a value sent to you in the email saying what form it is from or having some unique identifier attached to the form for internal use.
- Markup - Markup components are used for adding text and markup to your form. This could be HTML or plain text.
- Page Break - Page breaks allow you to paginate your form, that is, having multiple pages for your user to fill out. This can help organize your form.
- Select Options
- Textarea/Textfield - Textareas and textfields are very similar. They both allow you to have the user enter text into the form. The only differences are that textareas are multiple lines (or rows) and textfields are a single line (or row).
Step 2a. Configure Settings for Each Component Added
This page is going to be filled out much like you would fill out a form when creating a new Page for your website. Below you will see descriptions for all fields you need to fill out for the page.
- Label - This is the text that will be displayed to the user.
- Field Key - The unique identifier the system uses to validate the field. In most cases this can be left alone.
- Default Value - This is the value that will be prepopulated in the field when the user loads the page. This field can be left blank.
- Description - A short paragraph that will be displayed to the user under the form component that will let the user know what the field is.
- Display - If your form requires a strict display output, you can optionally select to edit the width of the component and also place text before or after the component.
When you are finished configuring the component, click on Save Component to add it to your form.
Step 3. E-Mails
Once a form is submitted, you will probably want to e-mail the results to somebody. To set this up, click on the E-Mails tab shown in Picture 2.

Picture 2
You have two ways of setting up an e-mail:
- You can enter an e-mail address to send it to by typing into the
 field and clicking
  .
. - If you have added one or more E-Mail Component(s) to your form, select the desired one from the drop down list (shown in Picture 3) and click .
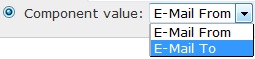
Picture 3
Step 4. Form Settings
This page has a list of settings you can configure for your form.
- Confirmation Message - This will be the message that is displayed to the user after successfully submitting the form.
- Redirection Location
- Confirmation page: show the confirmation message that you typed out above.
- Custom URL: send the user to a different page on the website or to a different website.
- No Redirect: when the form is submitted, this will keep the user on the current page (where the form is located).
- Submission Limits and Form Status
- You can setup a limit for the amount of time the form can be submitted. The count is only increased upon a successful submission.
- The status of the form can be Open or Closed and determines wether the form can be shown/submitted or not.
Viewing Submitted Results
To view submissions of the form, simply click the  tab.
tab.